 mz.

I needed a shared directory that two servers could both write to — a staging area for automated backups and sync jobs. NFS (Network File System) is the simplest way to do that on a LAN. It is built into the Linux kernel, requires no subscription, and exists on every Ubuntu install natively. Here is how I set up the server side and verified it actually works.
Ubuntu 26.04 · linux-nfs.org · libnfs on GitHub
Requirements
- Two Ubuntu 26.04 machines on the same LAN (or local loopback for testing)
- TCP ports 111 (portmap) and 2049 (nfsd) open on the server
- sudo access on both machines
Step 1 — Install NFS Server
Install the NFS kernel server and common utilities.
sudo apt-get install -y nfs-kernel-server nfs-common
# User sessions running outdated binaries:
  # root @ session #95: php[232825]

  # No VM guests are running outdated hypervisor (qemu) binaries on this host.
activeStep 2 — Create and Export a Directory
Create the directory you want to share, then write its export rule into /etc/exports. Each line has the form export_path client_net(options, ...).
sudo mkdir -p /srv/nfs/projects
sudo chown root:root /srv/nfs/projects
sudo chmod 2775 /srv/nfs/projects
echo '/srv/nfs/projects 192.168.1.0/24(rw,sync,no_subtree_check,root_squash)' > /tmp/exports
sudo cp /tmp/exports /etc/exports
sudo exportfs -rav
exporting 192.168.1.0/24:/srv/nfs/projectsVerify the export is live:
exportfs -vThe output shows 192.168.1.0/24 with rw,sync,root_squash,no_subtree_check. Reference the diagram below for the request flow through the stack.
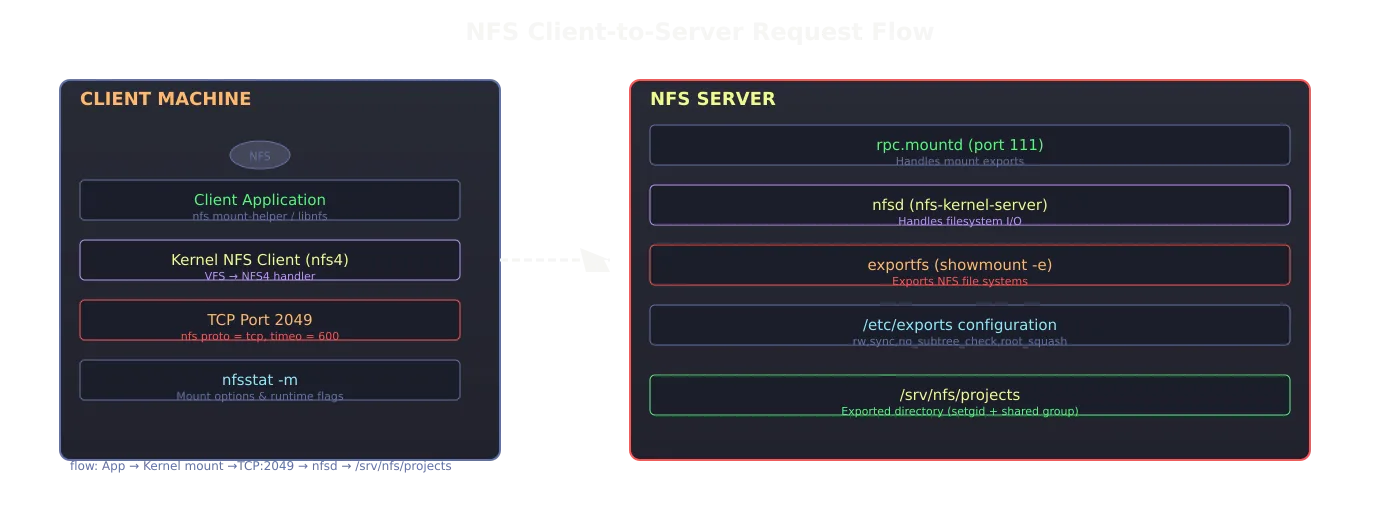
Step 3 — Mount from a Client
On the client machine:
sudo apt-get install -y nfs-common          # install NFS client
sudo mkdir -p /mnt/nfs
sudo mount -t nfs -o vers=4.2 server-ip:/srv/nfs/projects /mnt/nfs
df -hT /mnt/nfs
Filesystem                  Type  Size  Used Avail Use% Mounted on
127.0.0.1:/srv/nfs/projects nfs4 39G 7.8G 31G 21% /mnt/nfsCheck the mount options at runtime:
mount | grep /mnt/nfs
127.0.0.1:/srv/nfs/projects on /mnt/nfs type nfs4 (rw,relatime,vers=4.2,rsize=524288,wsize=524288,namlen=255,hard,fatal_neterrors=none,proto=tcp,timeo=600,retrans=2,sec=sys,clientaddr=127.0.0.1,local_lock=none,addr=127.0.0.1)Step 4 — Test Writes and Understand root_squash
NFS maps the client root to nobody:nogroup by default. This is called root_squash and is the secure default — no client can bypass the server’s file permissions by connecting as root.
# write a file via NFS as root (squashed to nobody)
echo 'some config' | sudo tee /mnt/nfs/squash-test.txt
ls -n /mnt/nfs/squash-test.txt
-rw-r--r-- 1 nobody nogroup 12 Nov 14 11:04 /mnt/nfs/squash-test.txtA throughput test over the loopback mount (your LAN will be slower):
dd if=/dev/zero of=/mnt/nfs/dd-test bs=1M count=256 conv=fdatasync
268435456 bytes (268 MB, 256 MiB) copied, 2.2447 s, 120 MB/sStep 5 — Persistent Mount via /etc/fstab
Add an entry to /etc/fstab and test it with mount -a.
# add to /etc/fstab
echo "server-ip:/srv/nfs/projects /mnt/nfs nfs defaults,_netdev 0 0" | sudo tee -a /etc/fstab
sudo mount -a && mount | grep /mnt/nfs
127.0.0.1:/srv/nfs/projects on /mnt/nfs type nfs4 (rw,relatime,vers=4.2,...,_netdev)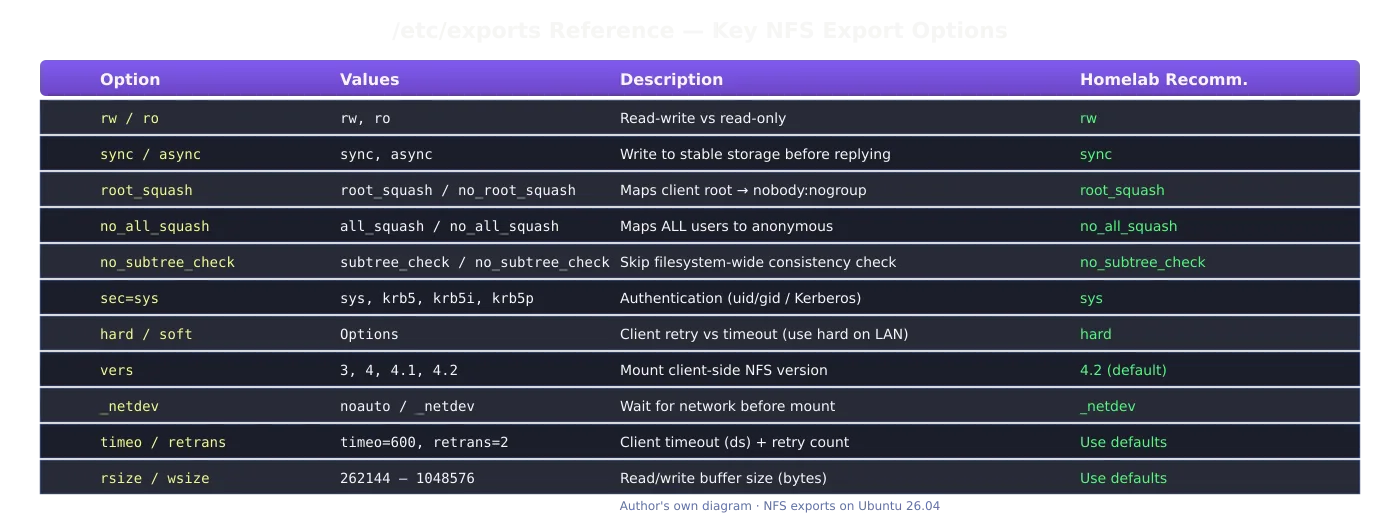
Debugging Note — root_squash Permission Denied
On my first try, writes failed with Permission denied despite running as root. The export used root_squash (the sensible default), which maps the client’s root account to nobody:nogroup. But the export directory /srv/nfs/projects was owned by root:root with mode 2775 — group nogroup had no write permission. NFS squashes before the filesystem permission check. The fix: give the directory a group that nobody belongs to (nogroup) and enable the setgid bit so newly created files inherit the group.
sudo chgrp nogroup /srv/nfs/projects
sudo chmod 2775 /srv/nfs/projects
# Now writes via NFS succeedWrapping Up
NFS gives you a zero-conf shared filesystem over TCP. The server is a single apt-get, the client is a mount command. If you need to move data between machines, pair NFS with rsync vs rclone for backups, secure it with nftables, and cap its CPU/memory with systemd resource limits. The flow diagram and the export options reference above should help you get the defaults right the first time.