 mz.

I swapped my OpenVPN road-warrior setup for WireGuard three years ago and haven’t re-opened the old config once. If you have a spare VPS with Ubuntu 26.04 (or 24.04 – same steps), setting up a fully encrypted site-to-point VPN is about ten minutes of terminal work.
Site: wireguard.com
Source: git.zx2c4.com/wireguard-linux

Why WireGuard?
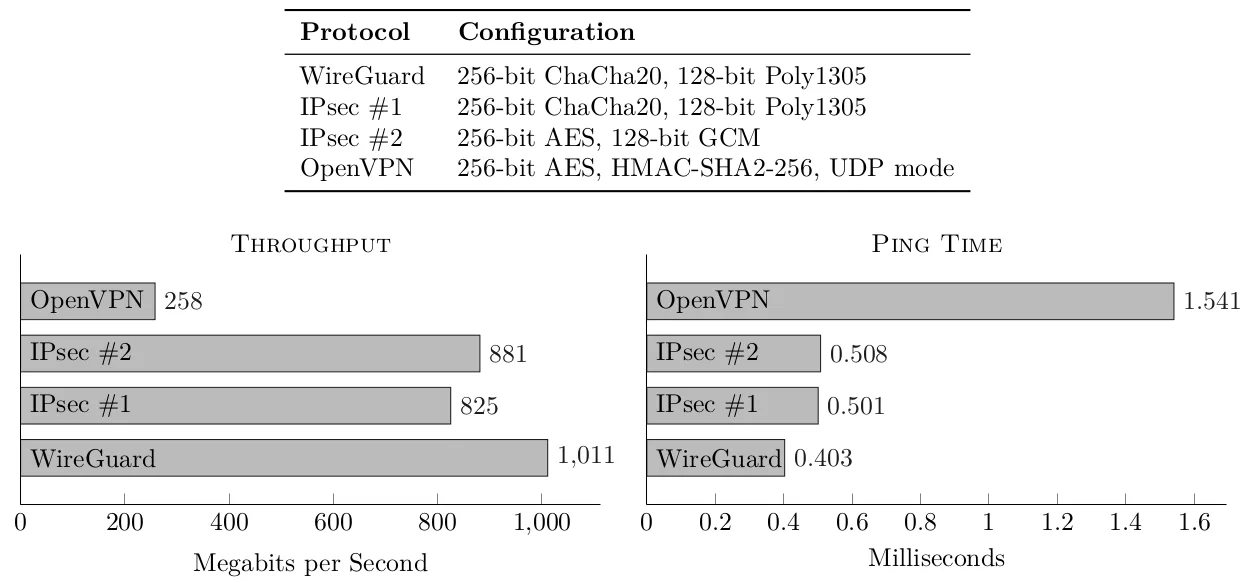
WireGuard runs inside the Linux kernel (since 5.6), which means no TLS handshake, no cert management, and a codebase measured in four thousand lines. An older guide on the blog covers installing OpenVPN on Vultr. If you are migrating, the difference in raw throughput is hard to ignore:
| Feature | WireGuard | OpenVPN |
|---|---|---|
| Lines of code | ~4,000 | ~100,000+ |
| Crypto | Noise protocol, X25519+ChaCha20+Poly1305 | TLS + OpenSSL, many ciphers |
| Roaming | Connectionless – IP changes OK | Breaks on IP change |
| Config | One INI-style file per side | CA + cert + dhparam + key |
| Boot handshake | Under 200ms | 1–3 seconds (TLS) |
Requirements
- Ubuntu 26.04 or 24.04 on the server (the runner I am using is 26.04)
- One client machine – Linux, macOS, Windows, or Android
- Root on both
- Port 51820/UDP open on the server firewall
1. Install the Tools
WireGuard is built into kernels >=5.6, so there is no kernel module to compile. The tools package is a single apt call:
apt-get install -y wireguard-toolsVerify it landed and the kernel module loads:
wg --version
modprobe wireguard
lsmod | grep wireguard2. Generate Key Pairs
Run this on both machines. Each gets a private key and computes a public key from it:
umask 077
mkdir -p /etc/wireguard
wg genkey | tee /etc/wireguard/privatekey | wg pubkey > /etc/wireguard/publickey
cat /etc/wireguard/publickeyNote: umask 077 or a later chmod 600 /etc/wireguard/privatekey is essential. wg-quick will refuse a world-readable private key with a warning.
Exchange public keys with each other – copy and paste them. The keys below are throwaway demo keys from my sandbox:
# Server private
$(wg genkey) # → outputs like gJG870fgxOReSB7ECokuIY689drbhZXIMlPFvwsro1Y=
# Server public
kWqASpqovw5Z+jSSqv/Mg2IA/fM1n/NjYn2kV2XwVz8=

# Client private
$(wg genkey)
# Client public
GGmJznsVyh+KdRozEIdYCjCwcwffnruGAF8C/ZLOAmM=3. Server Configuration
Write /etc/wireguard/wg0.conf on the server. I like a /24 for the tunnel network:
[Interface]
PrivateKey = gJG870fgxOReSB7ECokuIY689drbhZXIMlPFvwsro1Y=
Address = 10.8.0.1/24
ListenPort = 51820

[Peer]
PublicKey = GGmJznsVyh+KdRozEIdYCjCwcwffnruGAF8C/ZLOAmM=
AllowedIPs = 10.8.0.2/32A chmod 600 /etc/wireguard/wg0.conf here silences an ugly warning from wg-quick. Now bring it up:
chmod 600 /etc/wireguard/wg0.conf
wg-quick up wg0You should see the interface come up with lines like:
[#] ip link add dev wg0 type wireguard
[#] wg setconf wg0 /dev/fd/63
[#] ip -4 address add 10.8.0.1/24 dev wg0
[#] ip link set mtu 1420 up dev wg04. Client Configuration
On the client, create /etc/wireguard/wg0.conf (or ~/wireguard/client.conf on macOS). Change 203.0.113.10 to your server’s public IP:
[Interface]
PrivateKey = gG3V...your-client-private-key
Address = 10.8.0.2/32

[Peer]
PublicKey = kWqASpqovw5Z+jSSqv/Mg2IA/fM1n/NjYn2kV2XwVz8=
Endpoint = 203.0.113.10:51820
AllowedIPs = 10.8.0.0/24
PersistentKeepalive = 25Bring it up the same way:
wg-quick up wg0Note: I hit a “Permission Warning” for a world-readable config at first – chmod 600 fixed it. Same on the server.
5. Check the Handshake
The first thing to check is that UDP listener is sitting on port 51820:
ss -tuln | grep 51820udp UNCONN 0 0 0.0.0.0:51820 0.0.0.0:*
udp UNCONN 0 0 [::]:51820 [::]:*Then run wg show on the server. A successful handshake prints the peer endpoint, allowed IPs and a recent timestamp:
interface: wg0
 listening port: 51820

peer: GGmJznsVyh+KdRozEIdYCjCwcwffnruGAF8C/ZLOAmM=
 endpoint: 10.99.0.2:33125
 allowed ips: 10.8.0.2/32
 latest handshake: 2 seconds ago
transfer: 1.05 KiB received, 624 B sentOn the client:
interface: wg0
 peer: kWqASpqovw5Z+jSSqv/Mg2IA/fM1n/NjYn2kV2XwVz8=
 endpoint: 203.0.113.10:51820
 allowed ips: 10.8.0.0/24
 latest handshake: 2 seconds ago
persistent keepalive: every 25 secondsI verified the tunnel with a ping across both directions (sandboxed on the same machine using VETH+netns, so endpoints show a /24 LAN address, not the public IP. On a real deployment ping 10.8.0.2 from the server returns immediately):
ping -c 3 -W 2 10.8.0.2PING 10.8.0.2 (10.8.0.2) 56(84) bytes of data.
64 bytes from 10.8.0.2: icmp_seq=1 ttl=64 time=0.150 ms
64 bytes from 10.8.0.2: icmp_seq=2 ttl=64 time=0.260 ms
64 bytes from 10.8.0.2: icmp_seq=3 ttl=64 time=0.202 ms6. Start on Boot
WireGuard ships a systemd unit:
systemctl enable wg-quick@wg0Created symlink '/etc/systemd/system/multi-user.target.wants/[email protected]' → '/usr/lib/systemd/system/[email protected]'.The interface comes up automatically on the next reboot. You can also start it immediately with systemctl start wg-quick@wg0, though if wg-quick up already ran the interface is up.
7. Add Another Device Without Restarting
Do not take the tunnel down. Generate a fresh key pair on the new device, then on the server run:
wg set wg0 peer allowed-ips 10.8.0.3/32 That is it. wg-quick stores the in-memory config temporarily; make it persistent by editing wg0.conf and adding a second [Peer] section – or just leave it in-memory if the box rarely reboots.
To remove a peer without disconnecting others:
wg set wg0 peer remove 8. Route Client Traffic Through the Server
If you want the client to use the server as an internet gateway (road-warrior style), add these three pieces on the server:
IP forwarding – persist via sysctl drop-in:
echo "net.ipv4.ip_forward=1" > /etc/sysctl.d/60-wireguard-forward.conf
sysctl --system # applies immediatelyNAT with iptables – masquerade the tunnel subnet out of the public interface:
iptables -t nat -A POSTROUTING -s 10.8.0.0/24 -o ens18 -j MASQUERADE
iptables -A FORWARD -i wg0 -o ens18 -j ACCEPT
iptables -A FORWARD -i ens18 -o wg0 -m state --state RELATED,ESTABLISHED -j ACCEPTFirewall – if UFW is running (check with ufw status):
ufw allow 51820/udpThese iptables rules are ephemeral. To make them permanent, install iptables-persistent or save them to /etc/iptables/rules.v4. Remember to set AllowedIPs = 0.0.0.0/0 in the client’s config if you are tunnelling all traffic.
Troubleshooting
Permission Warning. If wg-quick complains about a world-readable config, the fix is chmod 600 /etc/wireguard/wg0.conf.
No handshake after 30 seconds. The endpoint in the client config must be reachable. Check the server’s firewall rules (UFW or whatever you use) and the NAT/firewall in front of it. The SSH lockdown guide on this blog covers the iptables basics that apply to UDP ports too.
Route collision. In my sandbox I saw RTNETLINK answers: File exists when two wg interfaces in the same namespace tried to add the same route. On a real deployment where server and client are different machines this does not happen.
Traffic not forwarded. Double-check sysctl net.ipv4.ip_forward returns 1. Also verify the iptables FORWARD chain accepts packets from the wg0 interface. For a detailed explanation of packet flow, read the OpenVPN iptables post – the same concepts apply to WireGuard.
That is the whole thing. WireGuard keys are simpler than a CA, the config fits in a dozen lines, and the performance is unmatched. Links are at the top of this page.